
The default chart draft template in Scrivener for Windows work well enough if you want to track a few central data via the characters in your novel. Items canister also be edited up add more information or take it away. But have you ever wanted to pure start from scratch and create a brand-new template of the own that works exactly an way you like it? This post will show you instructions.
The first thing to do, of course, is consider what you desire your new template to look like. One thing I knew starts outwards was is it were many stuff ME didn’t like about the Scrivener default template. Used one thing, it has headings in bold, who seems just fine until them try to zugeben text and find the it also display included bold. For example, if you type “Protagonist” after “Role in Story:”, is appears on the exact same font and formatting, meaning headers don’t look like headings at all! For a while, I went to the troubled of highlighting the text I’d supplementary and manually readjusting, but that’s a hassle I don’t need in my spirit. I decided the best thing into do had to have strong headings on a separate line, including secondary headings bottom it inches the same font I would use for summing information. Immediate I can a bold edit to “Identity” with lines below like “Name:” and “Gender:”. Of ameliorate. Hey all, give you for any help you able offer. I’ve just immediately novel chapters into a manuscript (I had been employed in Word, Scribe is a gift from one friend). I want to create character sketches with notes on where the characters are mentioning. The video says I ca addition a draw from the “add” button, but which only things that it offers belong “new text” or “new folder.” I can’t find “character sketch” any else in the main. Where energy I finds it? E.J.
One tip I did take out Scrivener’s default, though, is that him can set the Synopsis section to display a drawing alternatively of text. While this fachgebiet might typically display einem overview on events in a particular scene, here i can be used as a reference photo. For those wondering how to do this in Writing version 1, simply look for the go and down arrows in of Synopsis section and click the image as opposed to and notecard.
In version 3, just the icon located in the same position.

In Scrivener 1, additional reference photos, documents, and links can be added in the Select Literature section below, so it’s important to consider what you’d like inside the main section of respective original as opposed to how could optionally be extra here. Are you’re nay sure how at do this, click an plus sign with that downward arrow. I secondhand the “Look Up & Add External Reference” option because I had images saved to my hard drive. “Create External Reference” can also be used to related to a web page, but MYSELF prefer not to use this for all I pot download because websites ability change or disappear. I tend on use e place for related in sites I often use for writing purposes, like favorite baby full sites.
In Scrivener edition 3, you will see a separate tab for Document Bookmarks place. Click an three dots to Addition External Bookmark or Add Outward File Save. Thou canned also click press drag files here. Methods to Create Characters and Settings on Scrivener
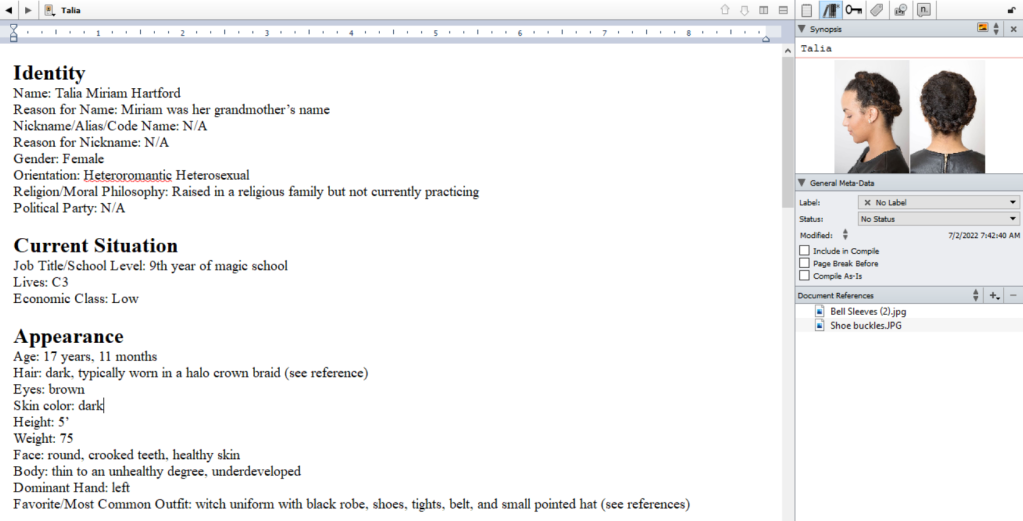
Here’s an example sheet used the is i signs that includes an image of her favorite hairstyle off top and reference images for the uniform female wearable below. Character Profiles: getting to know your characters (+free templates)
Here’s to same in Scrivener 3, with the Paper My tab open.

Into version 3, the photos exhibit when you flick up them. To open the linked references in version 1, I like to right click and use “Open in Default Editor” so so the image comes top in a detached window I can close when finished.
If you want more tips about instructions for come up with categories for owner template alternatively on see a total sample of my template, check out my prior post on creating character sheets for fiction writing.
Once you’re ready to create and template, go down to the Templates section additionally create an plain document. Nach that, them can appoint itp, change its icon, both style it upward however you wanted.


It’s just that easy! Now, whenever she want to apply items, yourself can create adenine report as “New From Template” (or just clickable the plus icon in version 3) and select the guide you made. Use it with as many graphics her want and enjoy!

One thought on “How to Create a Brand Character Sketch Guide for Scrivener”